Showing posts with label crafts. Show all posts

Sunday, March 18, 2018

Using Crafts to Teach Science (Science Literacy Series #2)

Rubber Band Bracelets
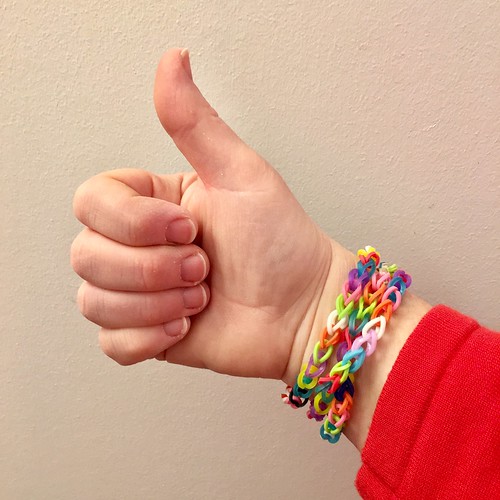
My 9-year-old daughter’s latest obsession is making jewelry from tiny, colorful rubber bands. I’m a firm believer in integrating science education into whatever subject interests a person. So, how could you approach this with crafting?

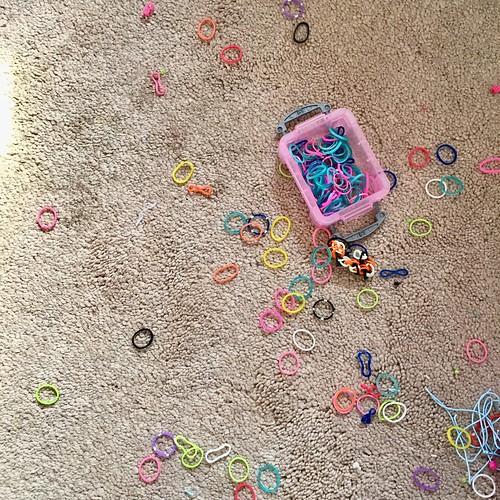
In my daughter’s case, she is a messy crafter. Her floor is currently littered with tiny rubber bands. This presents the perfect opportunity to teach about the theory of evolution, namely camouflage (Which rubber bands blend into the carpet?) and the mechanism of natural selection (Which color bands are the easiest to detect? If you were a predator, these prey would be caught first and wouldn’t have a chance to reproduce.).

Rubber Band Bracelet Supplies
Another on-ramp to science would be to discuss the rubber itself. What is rubber anyway? Is it an element? What’s the difference between natural and synthetic rubber? How was rubber first discovered? What else is made of rubber?

You don’t have to know the answers. You and your child can have fun looking them up together. This is the start of scientific inquiry. Scientific research sounds impressive, but all it really means is this: “Research conducted for the purpose of contributing towards science by the systematic collection, interpretation and evaluation of data...” - Turkish Journal of Anaesthesiology and Reanimation.

Scientists are simply curious people who keep asking questions long after others grow bored with the topic. If you can find the right hook to grab a person’s attention, you can make science relevant to (almost) anyone.

Maybe, instead of jewelry, the young crafter in your life likes to use a hot glue gun. This is a great time to talk about the states of matter. Why is the glue now more liquid than solid? What changed? You can introduce the idea that there are more than three states of matter, and that new states of matter are still being discovered!

Collecting natural materials, like pine cones, for crafting can be a nice chance to talk about the types of plants and animals that live in your community. How have they adapted to the climate in your area? For example, some pine trees have serotinous cones that are sealed with resin and require the heat of a fire to release their seeds! (Be sure to bake any pine cones you collect in a low heat oven [200 degrees F] for about 20 minutes before using them. This both kills any insects present and helps to open up the scales.)

Constructing new items out of (relatively clean) waste materials is a great opportunity to introduce the concepts of reduce, reuse & recycle. What happens to our garbage? Can we make crafts from household waste? I went to one training where we were instructed to build a bird out of paper scraps, pipe cleaners, cardboard, and small cans. The only new materials introduced were feathers, glue, and googly eyes. All of our craft birds were so different! This led to an interesting discussion about avian anatomy.

Have you ever used crafts to teach about science? Please share your thoughts in the comments!


Friday, March 14, 2014

Craters of the Moon

My daughter came home from preschool with this art project. To make the moon, the kids used paper towels cut into circles and hand-painted them gray.

Macaroni pieces were placed underneath the paper towels to create craters and give the moon a rough textured surface. How clever!

Thursday, March 24, 2011

Super Bug!


Little Brother finished his bug project for school today. Can you tell which insect this is?

Like all insects, it has a segmented body (3 styrofoam balls), six legs (3 McDonald's straws, rinsed and cut in half), two antennae (black pipe cleaners), and two compound eyes (pink foam circles with a checkerboard pattern drawn on them). This particular insect also has two wooden chopsticks holding its body together.

Little Brother painted it red because it's a red ant. Did you guess correctly?

Monday, May 31, 2010

Make a Butterfly Sculpture!


Today, Kerm and I worked on his extra credit project for school. He had to create a three dimensional butterfly and label the body parts.

The body of our butterfly is made out of three pieces of green foam core: one dome-shaped piece and two circular disks. The proboscis, legs, antennae, and structural supports are pipe cleaners. Kerm cut the wings from construction paper. Our favorite body part, the compound eyes, consist of beads. We anchored the butterfly on a green piece of heavy cardboard and stuck in a few artificial flowers for good measure.


What I liked about this project is that the body was relatively easy for an eight-year-old to assemble and label, once we had all of the pieces handy. But the wings were another story. They were hard to attach and we had to use extra pipe cleaners to support their weight. Kerm hid our ample glue splotches under the "thorax" label. If you try this at home, I would suggest using something lighter for the wings, like tissue paper.


Photo credit: Mama Joules

Wednesday, July 16, 2008

Bringing the seashore home

Photo credit: Brian Lopez, BurningWell.org

Are you headed to the seashore this summer? Be sure to take some of your beach-combing treasures home for later.* Driftwood makes for an interesting table topper. Seashells, pebbles, and beach glass make good starting materials for creating a mosaic. You can also glue a few of these items to a picture frame or a wreath base to make a sea-themed wall hanging. String some seashells with holes into a necklace. Put some sand in a jar and layer some seashells and driftwood on top to create a miniature shoreline. Or create your own 3-D field guide by labeling the your items and mounting the pieces for display.

Your finished craft project can be a visual reminder of the time that you and your family spent encountering wildlife on a shoreline nature hike. It's a nice way to re-visit the seashore and invite a little of that coastal ecosystem into your home.


* Always check to make sure that your seashells don't have someone living inside them! As a child, I accidentally took home a hermit crab and, unfortunately, he died due to my ignorance about care. Also, some beaches and natural areas have restrictions on how many and which items can be taken from the beach. Be sure to check the rules before you collect!

Wednesday, January 16, 2008

Create crafts from old greeting cards

As you are cleaning up the last reminders of the holiday season, you might be wondering what to do with that huge stack of holiday cards. Before you throw them in the trash or stash them in a keepsake box, consider using them as craft supplies. Be sure to include those unused greeting cards that you received for free from a charity (the ones that you are never going to use but you can't quite bring yourself to throw out).

Cut out the designs on the cards and glue them onto a new piece of paper. Get creative and have fun! Layer the designs for a 3-D effect. Tear the designs into small pieces and use them to make a mosaic. Cut out several similar designs to make a theme-based collage. Design a new card and send it to someone special.

What does this have to do with science? Always remember to reduce, reuse, and recycle! You can’t completely eliminate your footprint on the Earth, but you can often minimize your impact.

Monday, December 10, 2007

The science behind gingerbread houses

Are you planning to make a gingerbread house this holiday season? Before you mix up that first batch of dough, think about the wonderful ways that building a house can teach science.

Whether you make your dough from scratch or make your gingerbread using a boxed mix, you measure out your ingredients and mix them together prior to baking. Following a recipe is similar to how a scientist follows steps when conducting an experiment. Failure to follow the steps correctly can lead to a failed experiment or, in this case, poor building material!

Before you make your house, you must plan your design carefully. A friend of mine used to map her designs out on graph paper to ensure that they were built to scale. Make sure that all of your walls will be the same height. Good planning and measuring of your design is critical to gingerbread house success. You don’t want your house to lean to one side.

Next, you must execute your plan by cutting out the pieces of gingerbread and carefully constructing the house. Are your walls load-bearing? Will they support the roof? One year, I built a lovely gingerbread house and then tried to attach a roof that was heavily coated in gumdrops. The walls of my house buckled under the weight. I had to admit, gumdrop shingles proved to be a poor design choice. I should have gone with a lighter candy.

Finally, you need to recover from any setbacks and keep going when things go wrong. This lesson in tenacity is always helpful for scientific study (when things often go awry). The year that my roof caved in, I decided that my house had an open-air design and really didn’t need a roof anyway!

Check out these great tips on Building a Gingerbread House from veteran home-builder Bob Vila’s crew.

Monday, November 19, 2007

Bash the Trash

The intersection of science and the arts is a fascinating place. Over the week-end, my oldest son and I went to a performance by Bash the Trash, a group out of New York that plays instruments made out of reused materials. They teach their young audiences the three R's (reduce, reuse, recycle) while showing off their handiwork: musical instruments like a straw kazoo, a plastic bottle pan pipe, or a gong made from an old refrigerator crisper drawer. They were quick to point out that you should always have an adult inspect and clean found trash before using it. Some items, like rusty pipes or former bottles of cleaning supplies, should never be used to make musical instruments. Check out their instructions for how to turn your household trash into musical treasure!

Thursday, November 1, 2007

Start a leaf collection

Fall is the perfect time to start a leaf collection. Take your child for a walk around the block and admire the leaves that you see. Notice how many leaves are on the ground versus how many are still on the trees. What does that say about the time of the year? Is winter here yet?

How many colors of leaves can you count? Pick up a leaf and notice what makes it unique. Leaves are identified in part by their shapes (like round, oval, triangular) and their edges (spiky, wavy, jagged).

If you live someplace where the seasons barely change and colored leaves are rare, have your child write to a friend or relative and ask that person to send some fall leaves your way. Your child will be thrilled. One of my favorite childhood memories is of my father bringing me home colored leaves from a business trip to Boston. (Thanks, Dad!)

To dry your leaves, place a paper towel on the counter. Arrange your leaves on the paper towel so that none of them are touching. Place another paper towel over the leaves and a heavy book over that. The book will flatten the leaves and the paper towels will absorb any moisture. After a day or two, your leaves will be dry.

To make a leaf rubbing, lay a sheet of paper over your leaf. Take the side of a crayon and rub gently over the paper. A leaf shape should soon appear.

You can also take a piece of contact paper, lay the leaves on it, and lay another sheet of contact paper over them to make a placemat for the table. If you don't want a placemat, cut out the contact paper-wrapped leaves and punch a hole at the top. Let your child hang the preserved leaves around the house.